Announcements

  1. Asset Management and Custom Navigation

    New Feature
    Announcement

    Just a few things released last week. Multi-Turn Cards, Custom Properties and the ability to create custom navigation, manage assets, their finances, and relate them to tickets with Asset Management for Tikit.

    taskmaster-wait-what

    Custom Navigation

    Before we jump into Asset Management, what is now possible in the Agent portal is to introduce your own navigation on the left hand side or while editing a ticket.

    image

    In the above example, we've introduced 3 new pieces of navigation on the left:

    • Assets - loads Asset Management
    • Power BI - loads the Power BI Tikit Dashboard
    • Assets Dashboard - loads the Power BI Asset Dashboard

    But we've also introduced a Custom Tab, in this case Assets on the Edit Ticket experience. Granting you the ability to link tickets directly to Assets. Best of all, if you want to build your own custom experiences for the Edit Ticket experience. We're making ticketId (e.g. 5738) and requesterEntra (e.g. 84f5037d-ea3f-48db-9a92-f012c815ef36) session variables available when you're on the page. This means you can fetch the current Ticket ID and/or the Requester's Entra ID for use in your own applications. In our case, we can relate Assets directly to a Ticket.

    image

    But again, these can be anything and set in any order. So if you're currently using Power Apps, Power BI, or even your own custom application - you can now publish it into the Agent portal! Check out the KB over here for details on how to create, edit, and remove navigation.

    Asset Management

    It's one thing to talk about custom navigation and introducing support for Asset Management. So let's talk about what Asset Management actually is.

    image

    With Asset Management, we're introducing our first managed Power App that you can deploy to your own environment. Once deployed you can

    • Manually create/edit Assets
    image
    image
    • Configure Asset Management functionality and InTune sync (Azure App Registration) to automatically keep assets in sync every 24 hours
    image

    • Control financial data such as purchase orders, invoices, and warranties
    image

    • Relate Tickets to Assets
    image

    Reporting

    And of course, with the introduction of Asset Management. We've also released an additional Power BI dashboard template. As always with our reporting templates - you're free to download, customize, or build completely from the ground up.

    image

  2. Custom Properties and Multi-Turn Cards

    New Feature
    Announcement

    Tonight, we have a major release happening that we know all of you are excited about and have patiently been waiting for.

    • Want to alter the core ticketing experience with your own optional/required fields?
    • Looking for a custom list for Requesters to choose from when submitting a ticket?
    • How about creating conditionally dependent forms when creating a ticket?
    • Resending a Form to the Requester, Assignee, a Collaborator, or Affected User?

    We're not going to waste any more time than we have to. Let's jump into Custom Properties and Multi-Turn Cards arriving tonight; how they work separately, and how these two features play off of each other.

    itsabouttogodown

    Custom Properties: Creating and Modifying

    image

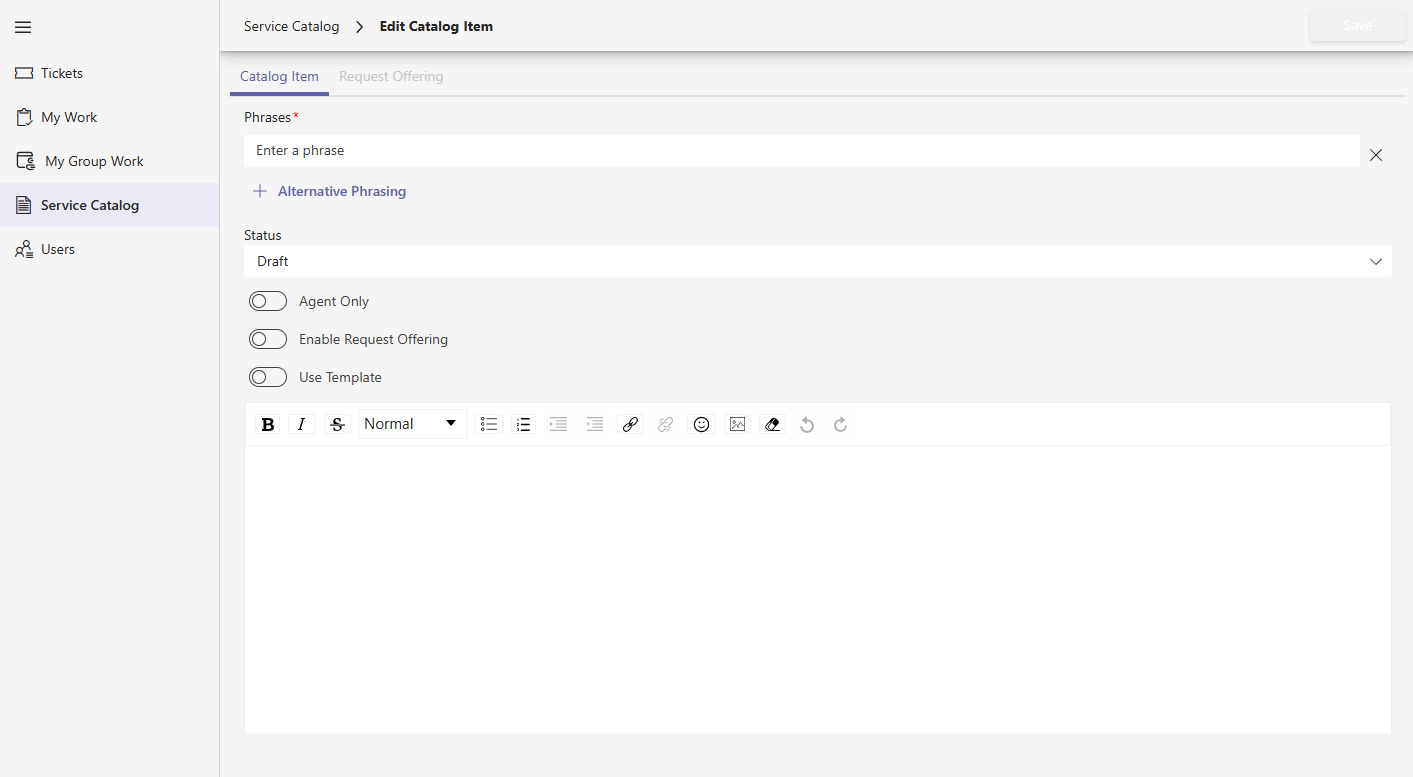
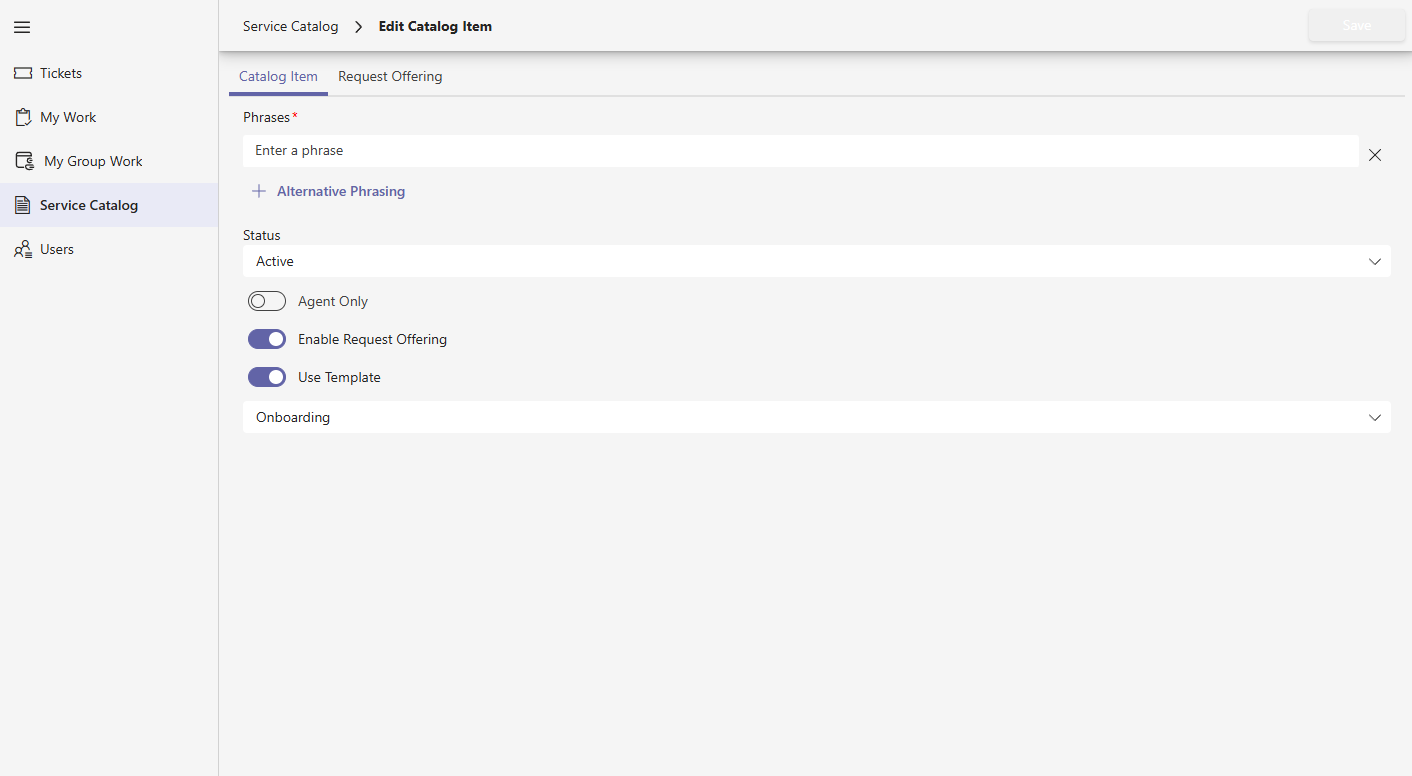
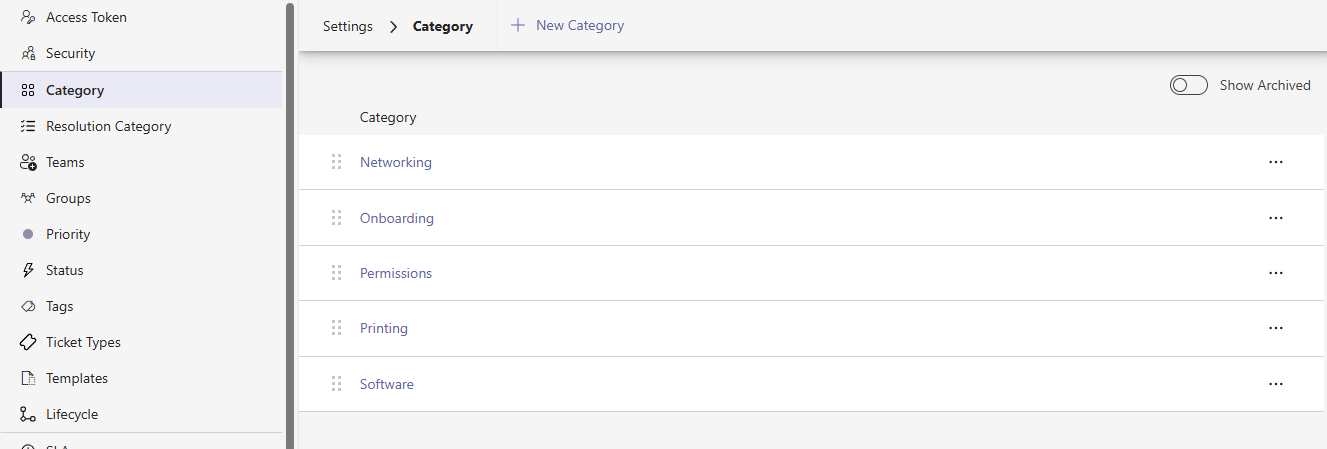
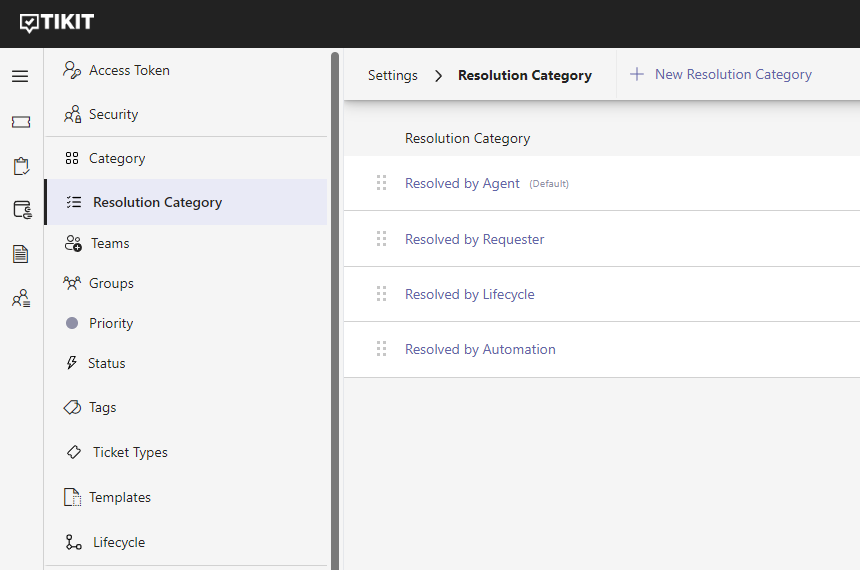
    Like other features before it, head into Settings and you'll see the new Custom Properties navigation node. It's here you can create, edit, archive/unarchive, delete, and re-order how your properties appear across the Agent portal and Teams cards.

    Creating a new property is easy, just click on New Custom Property or click an existing property to edit it.

    image

    In this case, I've created a Custom Property called "Location". It's a simple text field (string) that I can always change the (friendly) Name, Description, whether or not its required, the error message to display if it is a required field, and finally if its hidden from users.

    Why would I create a hidden custom property?

    With hidden properties you can create a field that exists on every ticket, but can't be changed by anyone. So why bother? Because with Tikit's Automation engine or custom API calls, you can set these fields behind the scenes. Opening the door to creating fields for external integrations such as syncing monitoring alerts, security event IDs, CRM records, and more.

    But of course, we are free to create any number of properties of any different kinds of types such as:

    • string (text)
    • numbers
    • yes/no (checkbox)
    • list
    • date
    • time

    While being able to accept free text on a field is helpful, it also opens itself up for potentially bad data since anything can be typed into the field. Which is why we've also introduced support for...

    Custom Properties: Lists

    With custom lists, you're now free to create any kinds of lists you need for your ticketing processes.

    image

    With a custom list, we're free to change a few things:

    • Allow multiple: Much like Tags, you can decide if multiple items in this list can be chosen
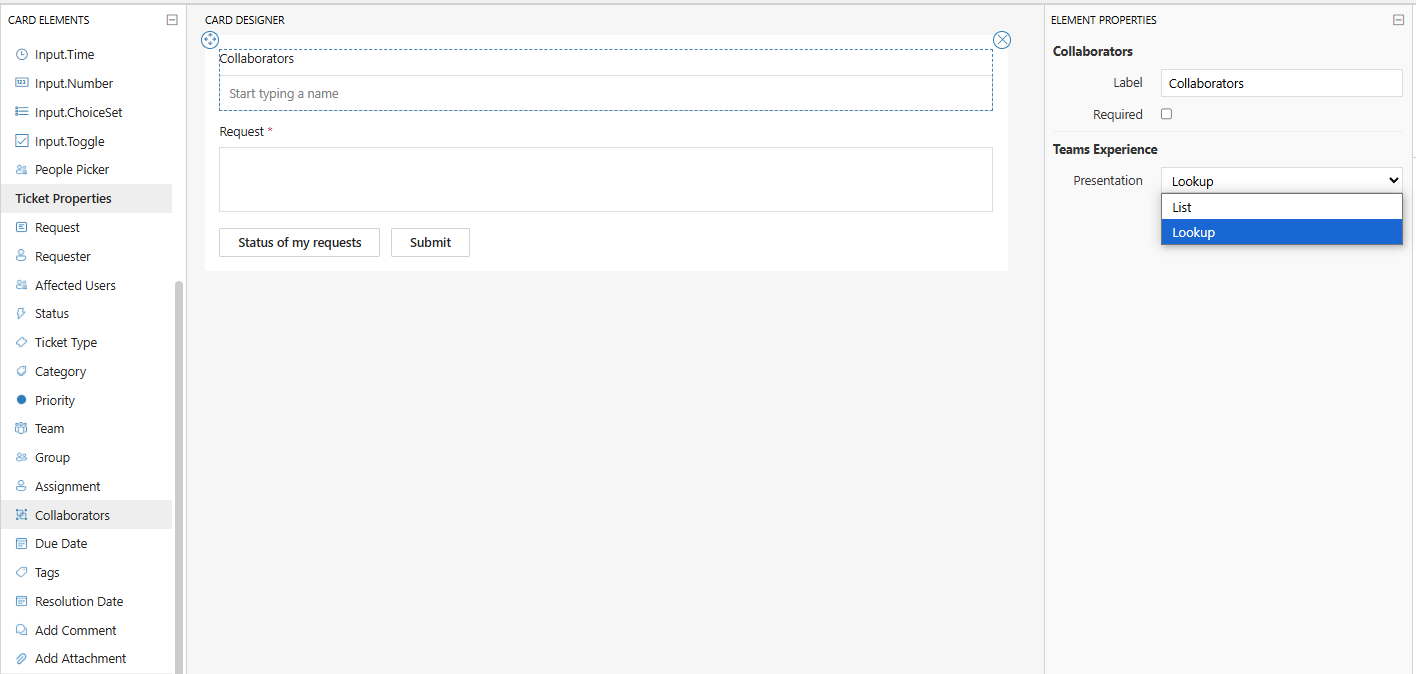
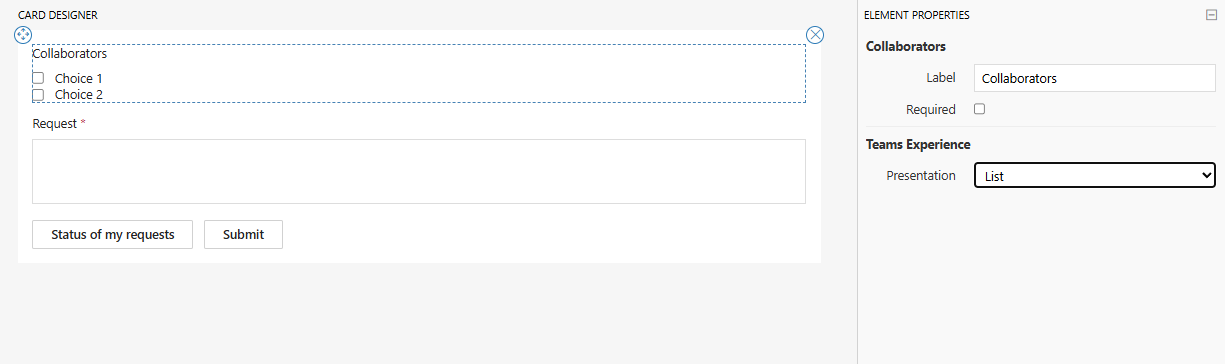
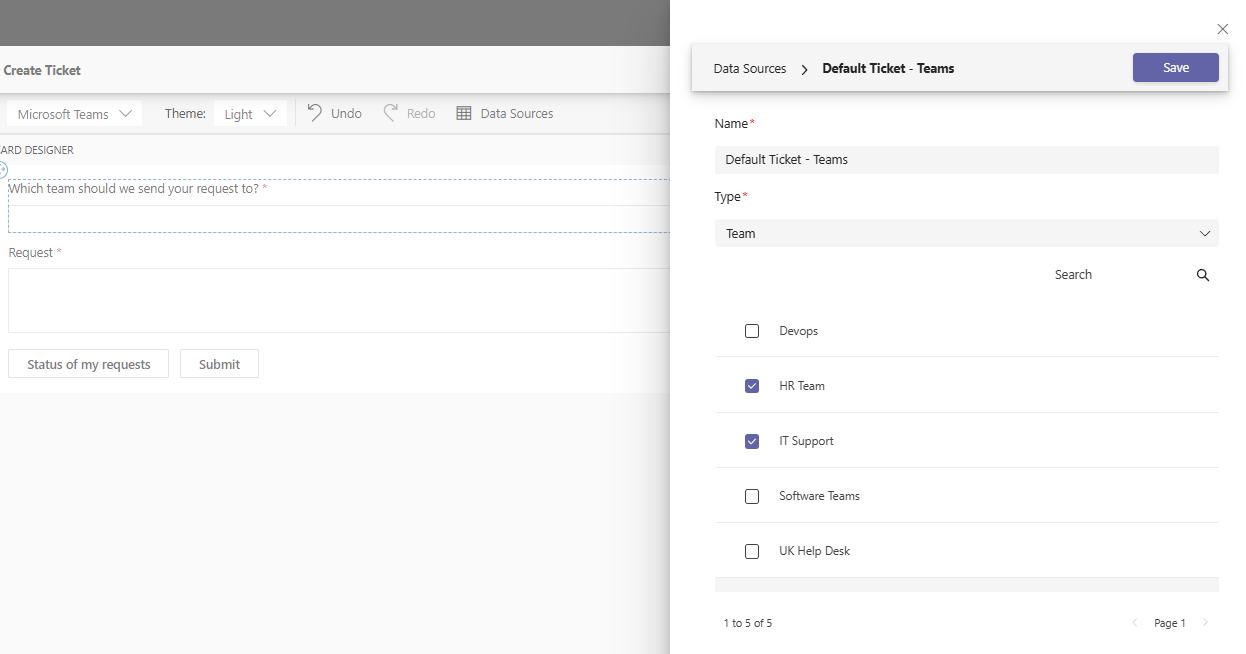
    • Teams Presentation: If you recall, just like in Forms you can decide how in Teams this list is experienced. Is it a dropdown with all of the choices? Or is it a lookup/search of all of your available options?
    • Individually Archive items: Apart from creating/deleting items in our list, we can also archive/unarchive items within the list as well.

    And of course, re-arrange those items at any point in time.

    With our one or many properties saved, we'll be returned to our list of all of our Custom Properties. Here we can re-arrange them and it's worth noting that changes are saved and instantly replicated across Tikit. This order impacts how you'll see Custom Properties when Creating a ticket, Editing a ticket, getting Teams notifications on the ticket, and more.

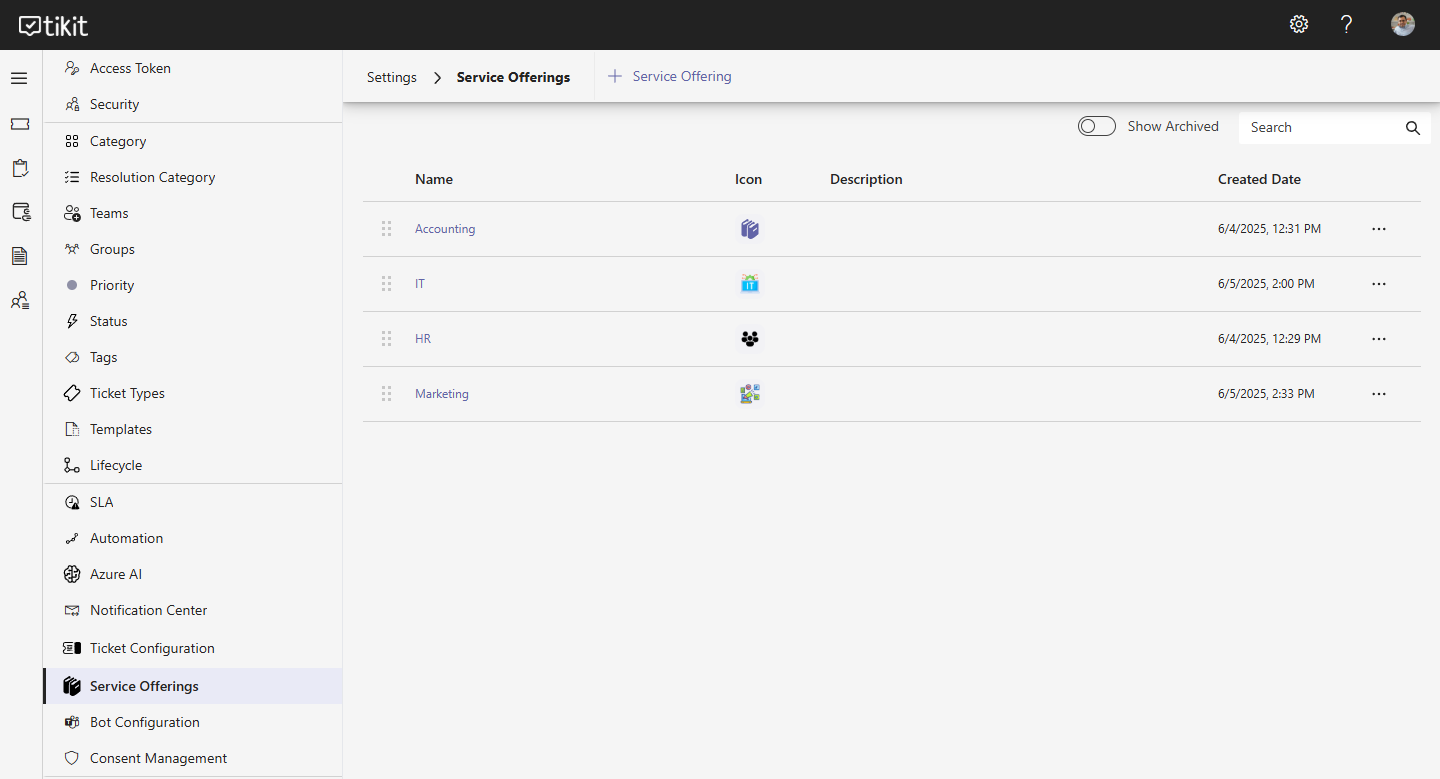
    Where are Custom Properties Experienced?

    With the advent of Custom Properties, there are a host of places across Tikit that they can be used. Such as:

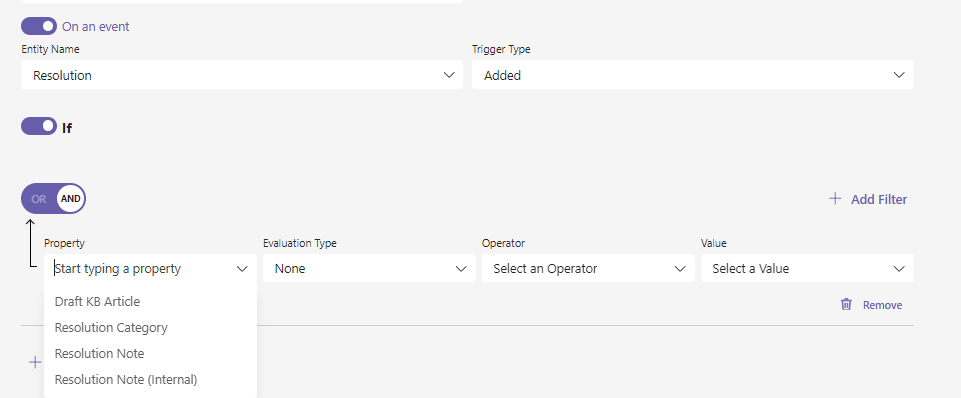
    • Build Automations and/or SLAs with them
    image

    • Use them in Notification Center automations
    image
    • Form Designer

    image
    • Create/Edit a ticket in the Agent portal
    image
    image
    • Power BI/Excel

    image

    And finally, Custom Properties are also available across all Templates.

    image

    Speaking of Templates, it's probably worth talking about the next big change that you might have already noticed in the above screenshot.

    Multi-Turn Cards

    Another longstanding request has been the ability to present multiple forms to a user to fill out, and conditionally present those forms based on how the previous form one was filled out. This would have several benefits:

    • Large forms served via Tikit Virtual Agent, Requester Portal or the Agent Portal could be condensed and/or split out into several smaller forms
    • Large forms (30+ inputs) in some cases might become very small forms (less than 10 inputs) depending on how they are answered
    • The Default Template: Requester Create Ticket Template could be modified to let users define their own Priority of a ticket and only if they choose High Priority, then a subsequent question appears asking for their contact information
    • When building a New Hire/Onboarding Template, you could conditionally present New Hardware and New Software Forms depending on their Department or any other number of fields

    So let's jump into what this means for Templates and Forms.

    Templates and Forms have been split out

    image

    The biggest visual change you'll see as a Tikit Admin, is that Templates and Forms have been separated. As a result:

    • You can create Templates with no forms, 1 form, or many forms
    • If you've created Templates with no forms previously, you had to re-create the template - no more! You can now add/remove forms from a Template as you see fit
    • You can create multiple Templates that leverage the same form

    As part of this upgrade, your Templates and Forms have been separated, named the same, but their relationships remains. Giving you freedom to modify existing Templates with a wholly new experience for...

    Managing Forms on Templates

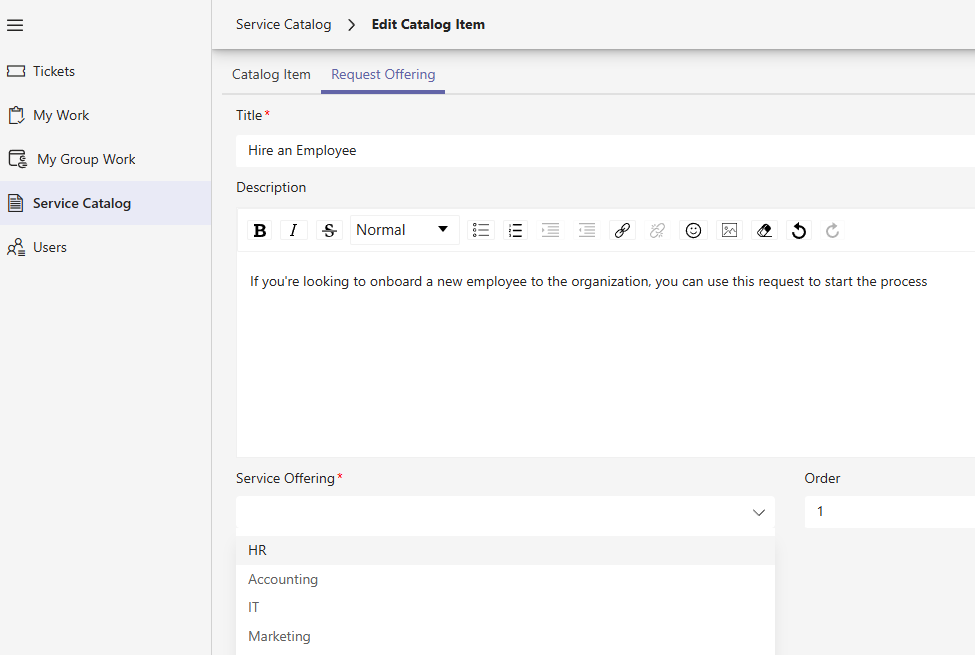
    Also available within Templates is the new Forms area. Here you can add one or many forms, define the Transition to move between them as someone fills them out, and decide what happens when those conditions are met.

    Multiple Transitions

    image

    Transitions with Logic Builder define the condition using any Input from the form

    image

    The Action associated with a Transition defines what happens when the condition is met

    image

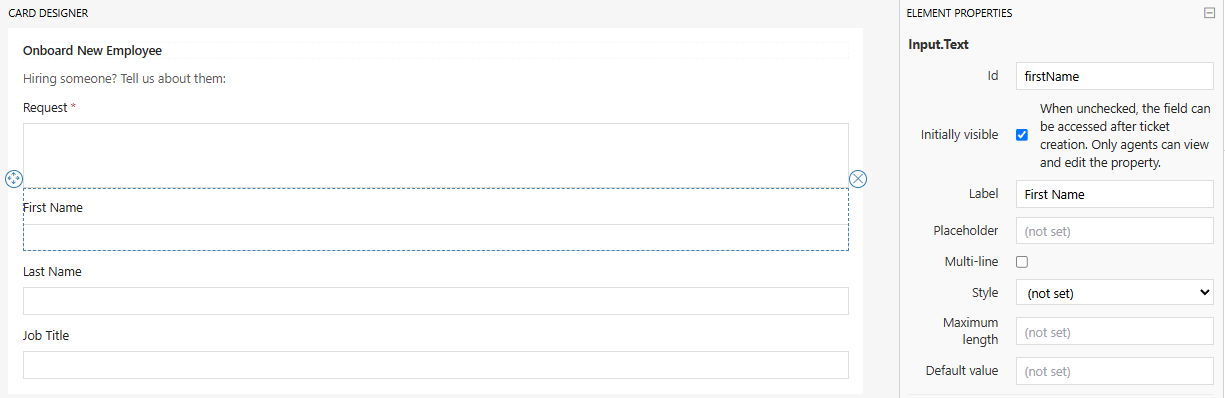
    In the above example, we have two forms for our Onboarding Employee Template. But the second form of New Hardware will only be served if on the first form Hardware Is Required is checked off. We also have a couple other options you can configure here as well:

    • Show the Summary Card: Before the requester can submit, they are presented with a card that shows their answers
    • Show Form Name: The names you've given your forms can optionally be shown to the user filling them out
    • Summary Card Header Text: optionally override the name of the Summary card

    These three options can be set on a Template by Template basis. So let's check out how ALL of this is experienced in Teams with Tikit Virtual Agent.

    image

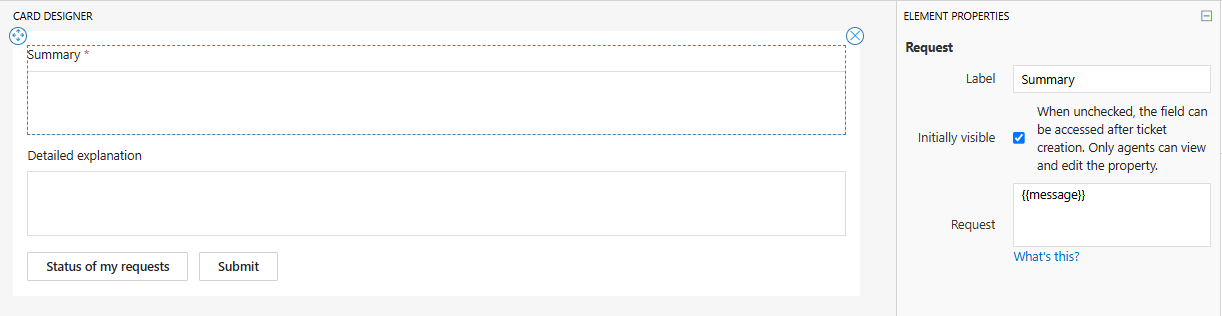
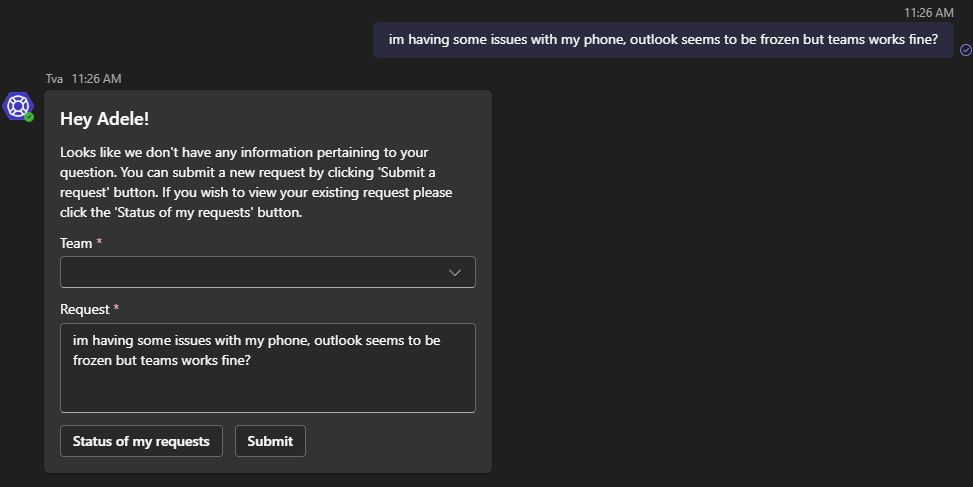
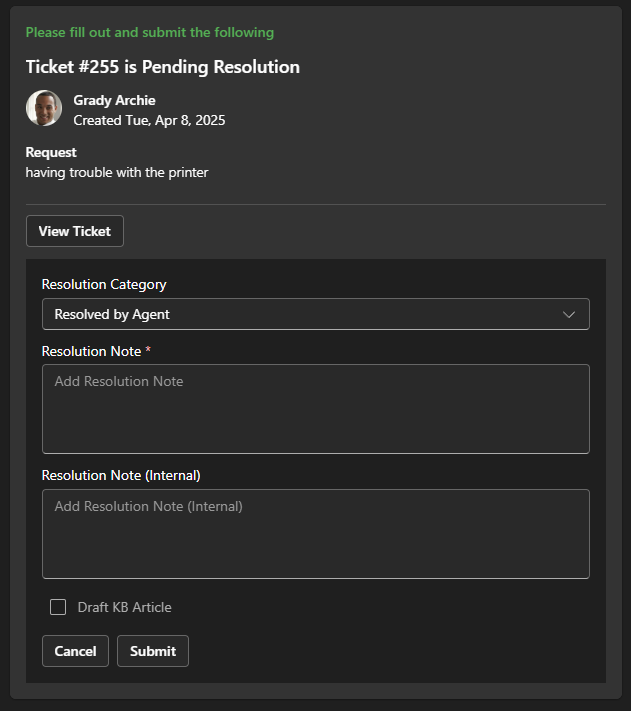
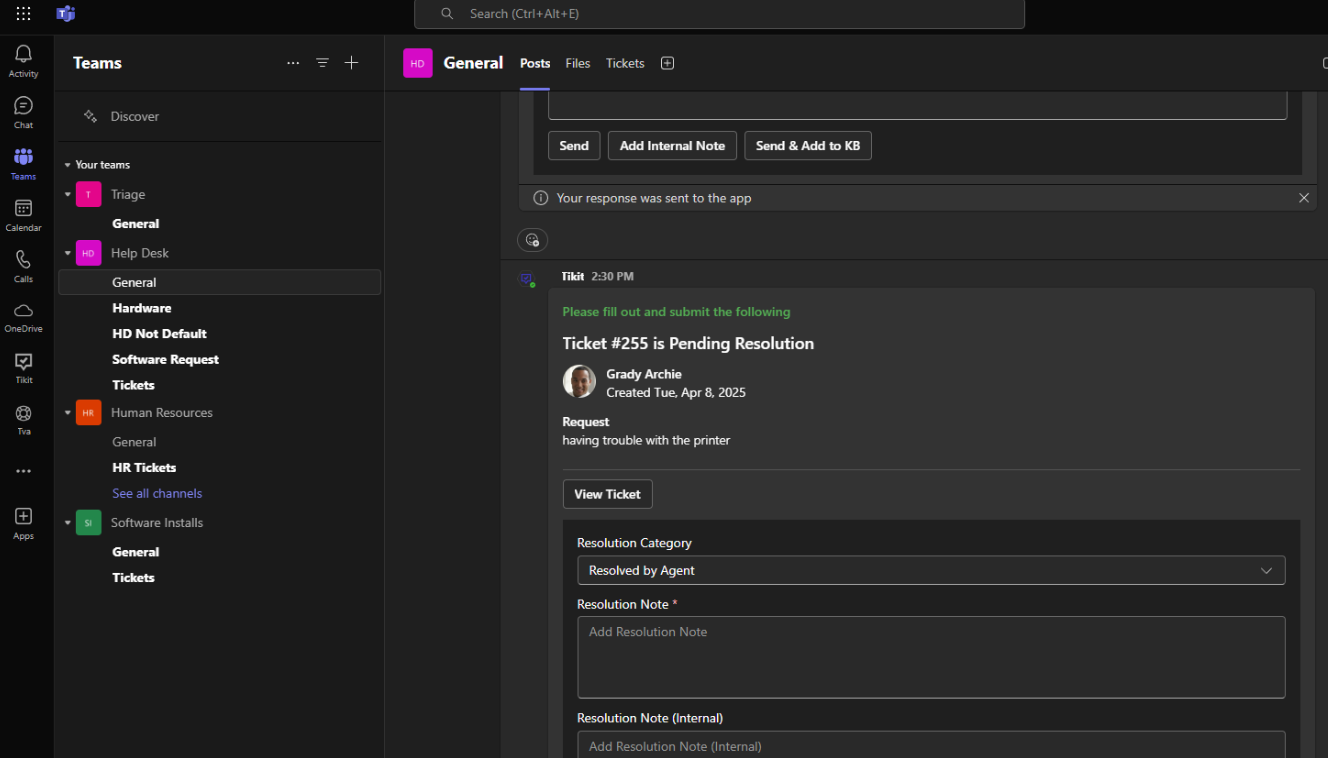
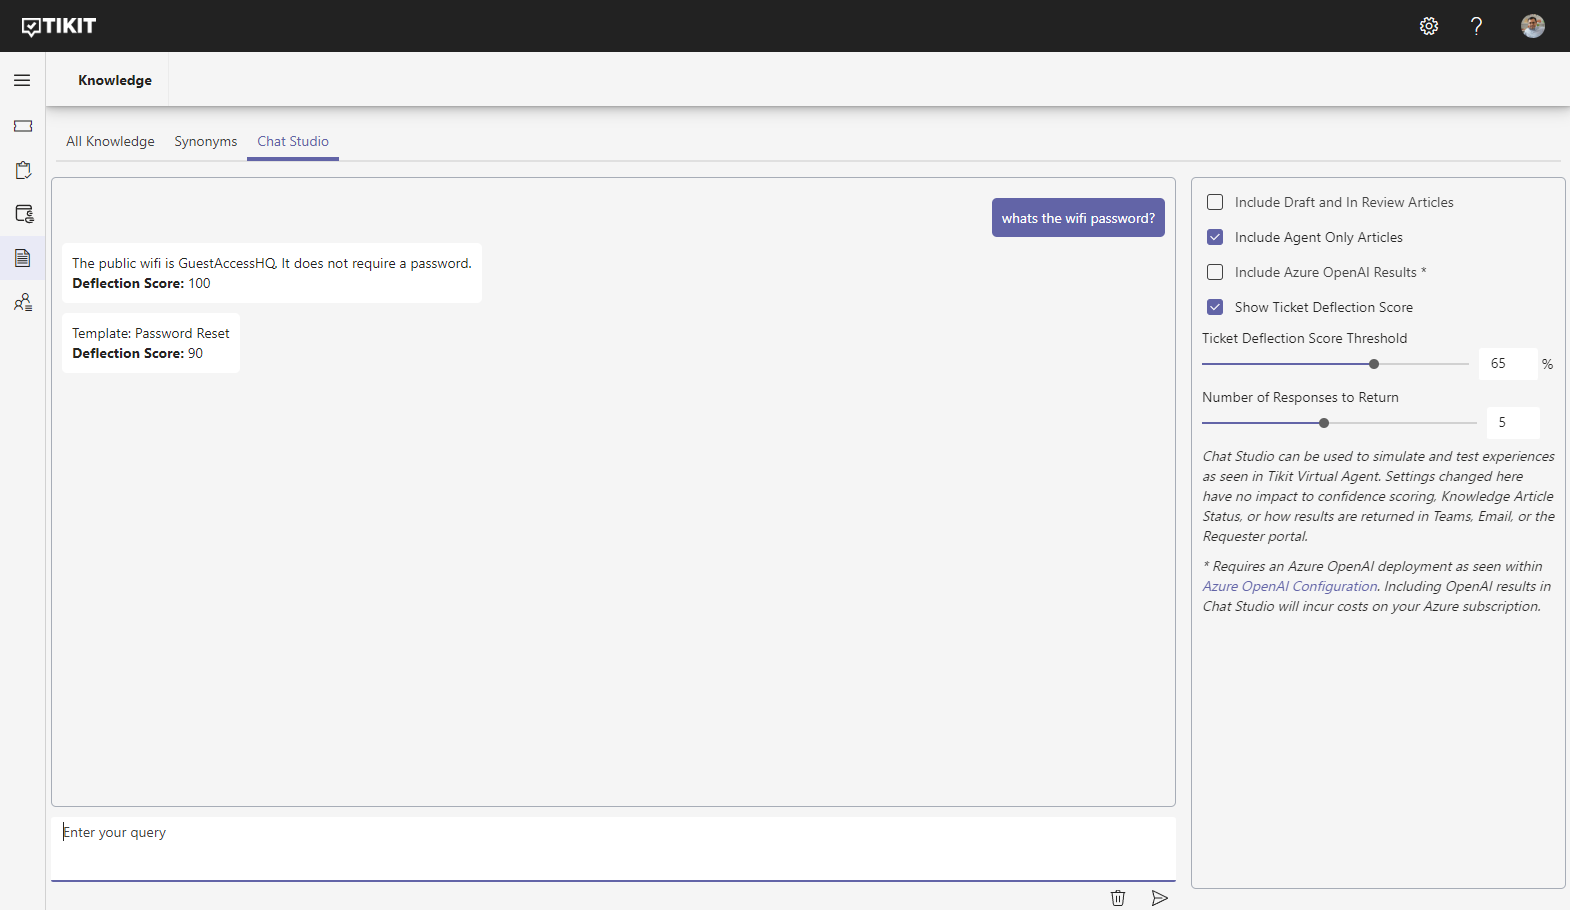
    Whether you request forms via chat, start them from from the Help Card or even on the Requester Portal. You can see that in our first form (on the left) we have a checkbox that drives whether or not the New Laptop form is shown to the user.

    • When it's unchecked, we go straight to the Summary Card.
    • When it's checked, we get a second form, and then the Summary card.

    You might also notice that subsequent forms present options for the user:

    • Cancel: Abandons the submit experience
    • Back: Goes back to the previous card that was filled out and maintains all current answers
    • Start Over: Goes back to the very first card and erases all of the answers filled out
    • Submit: Creates the ticket
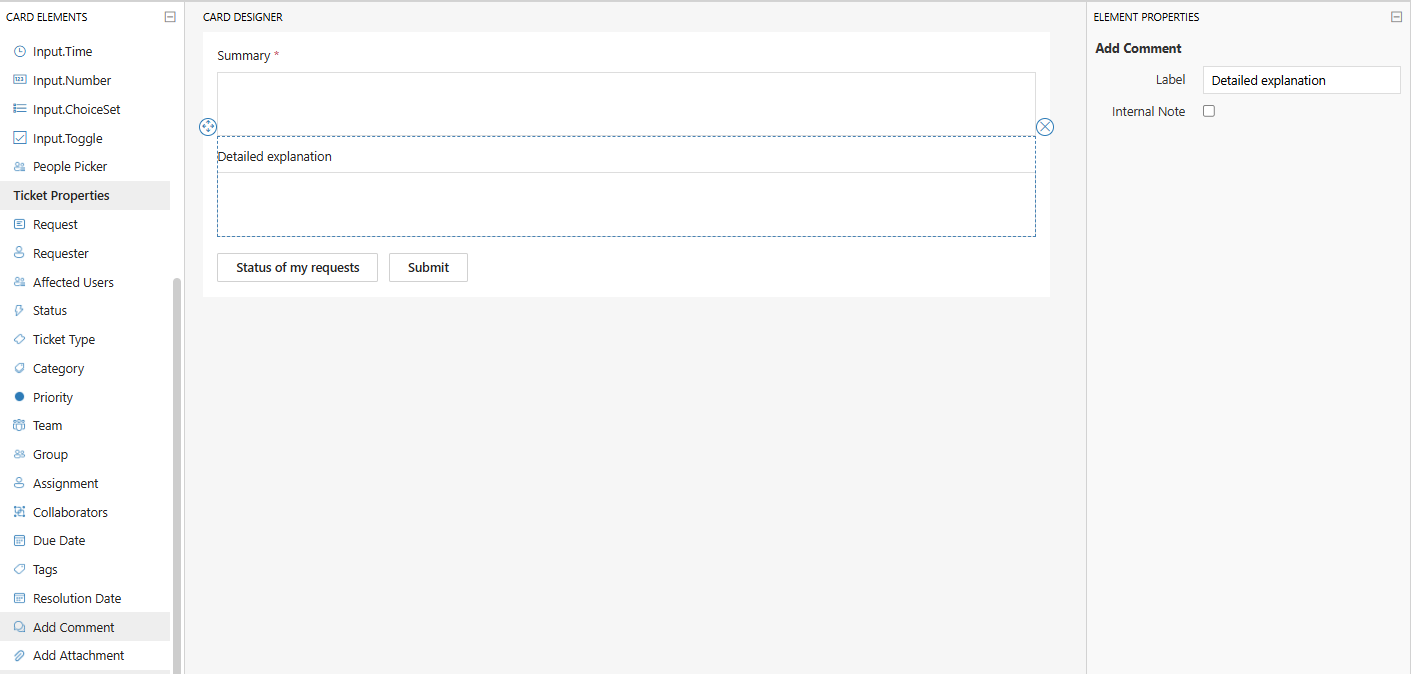
    Forms

    With it's own dedicated navigation, you can now create, edit, archive, unarchive, and delete forms.

    image

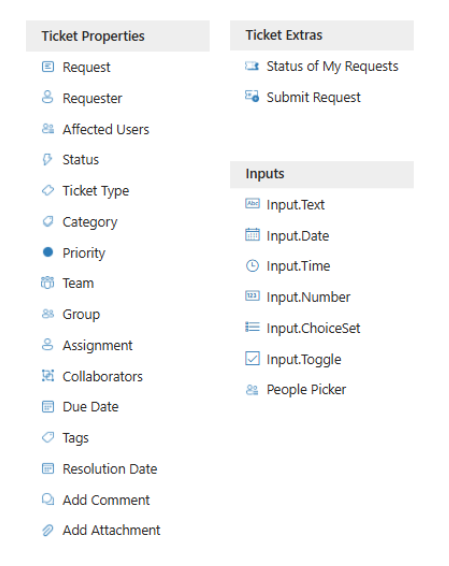
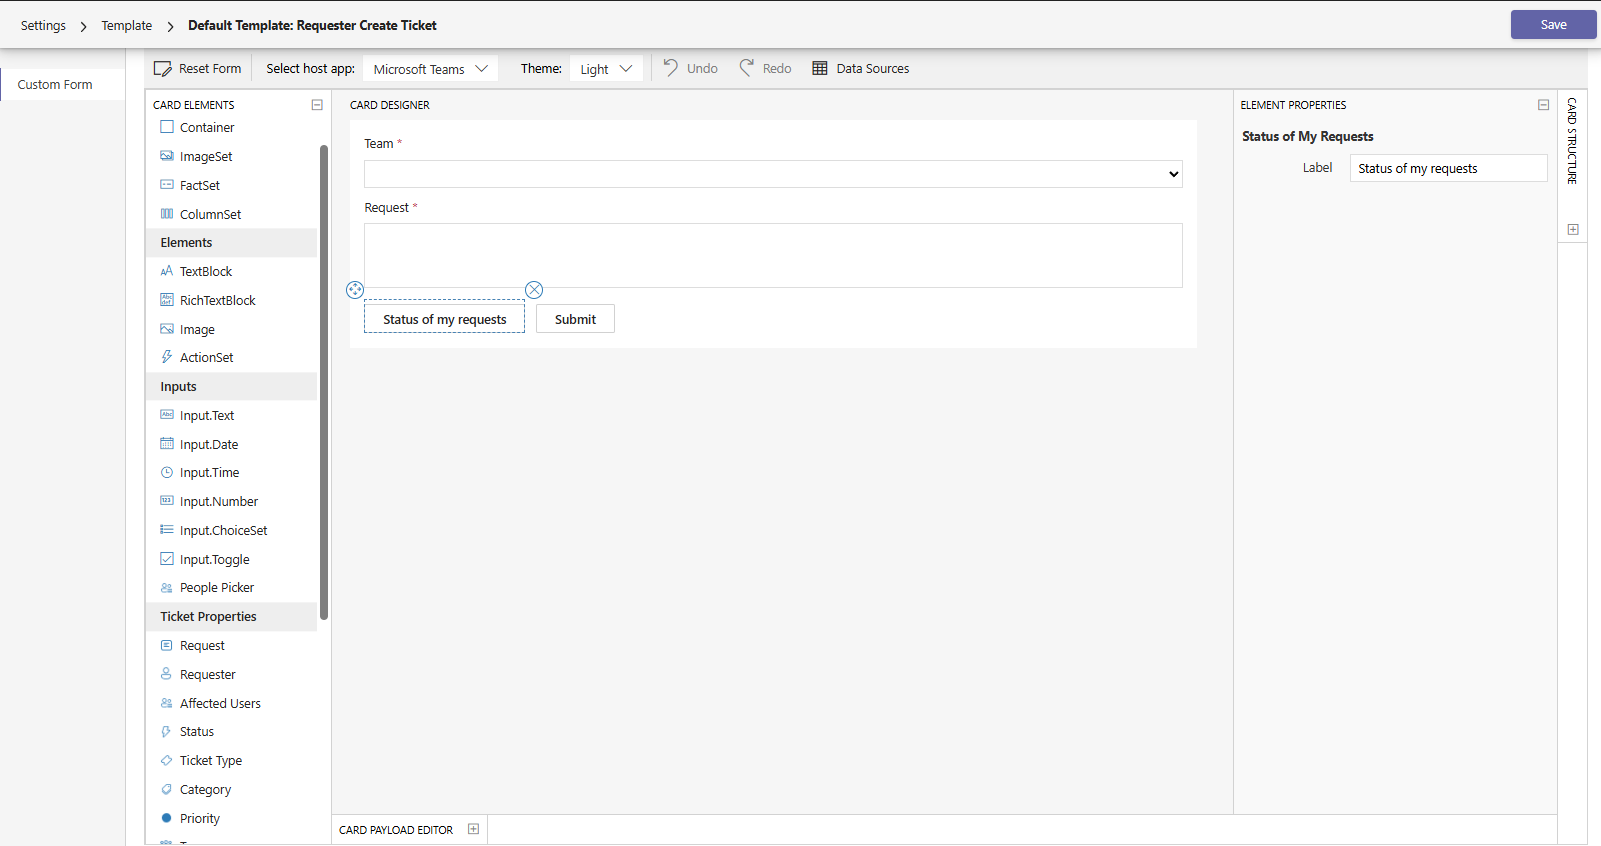
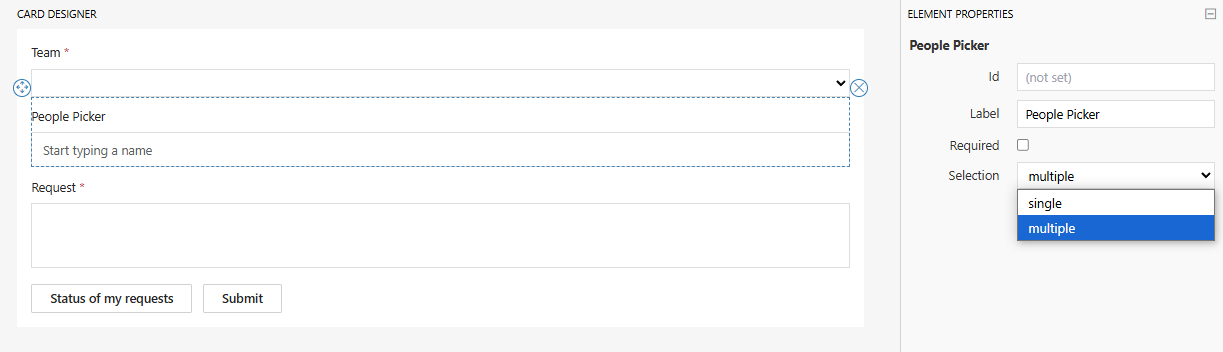
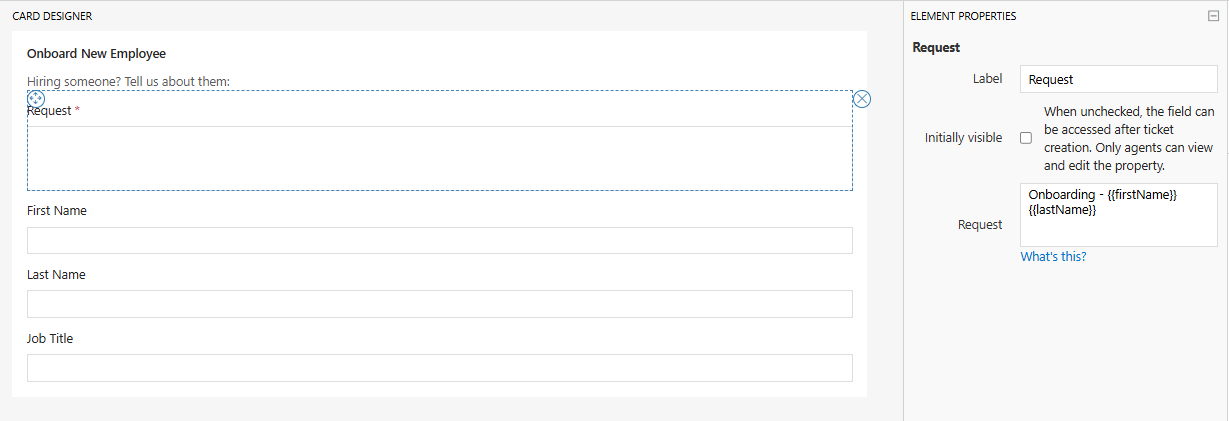
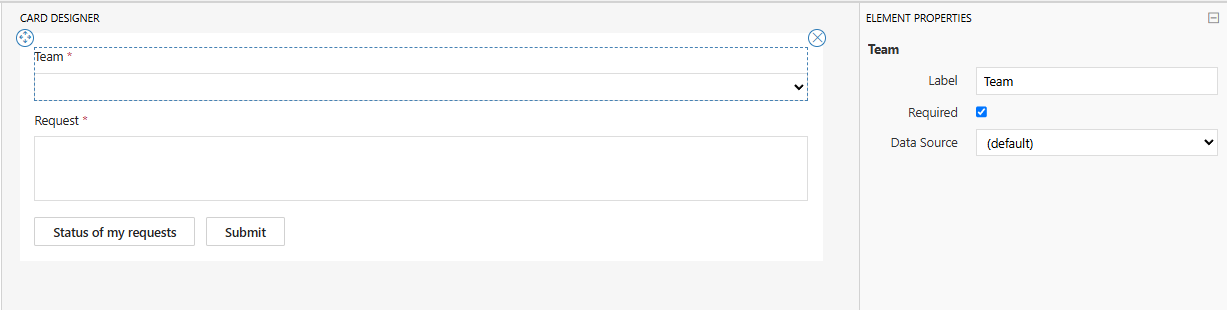
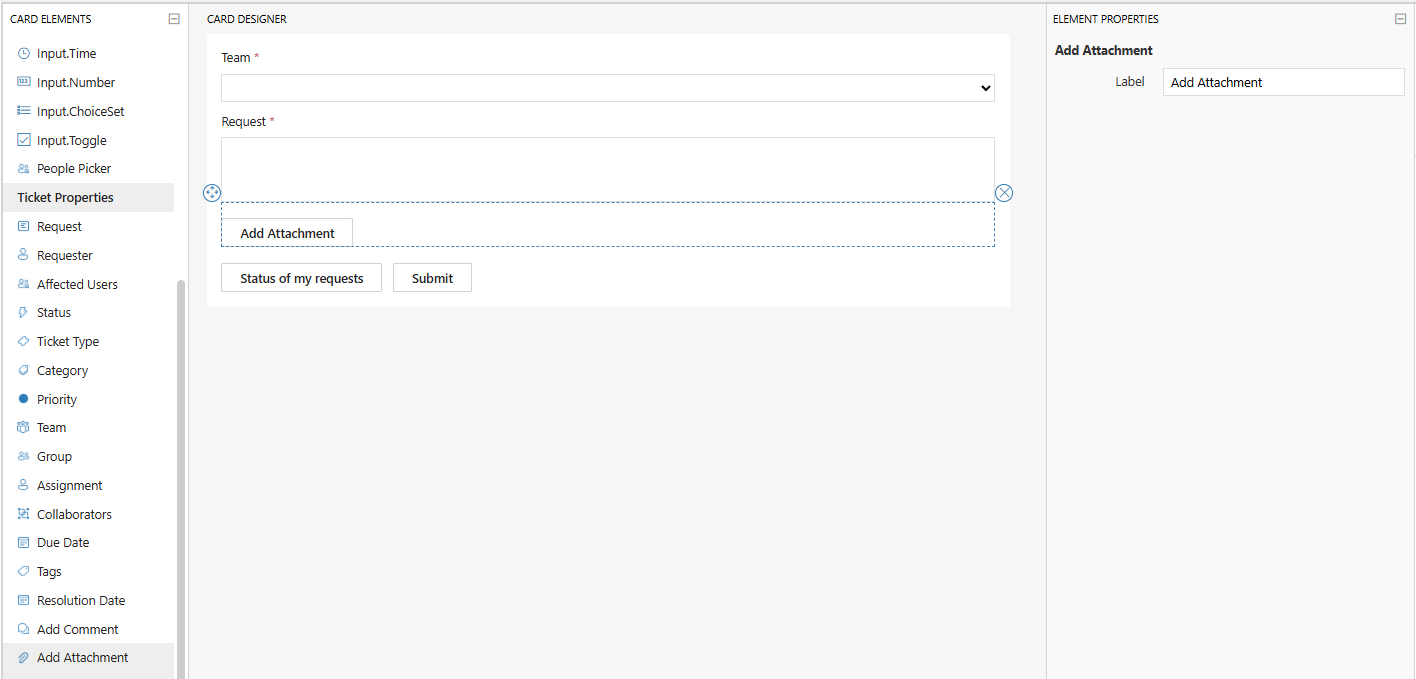
    Just like before, Form Designer offers you the ability to work within the Microsoft Adaptive Cards framework, add Tikit specific fields, and of course your own Custom Properties if you've created them. It also introduces the Name field along the top to give your forms context when viewing them in the list or when user's see them on the Summary Card.

    image

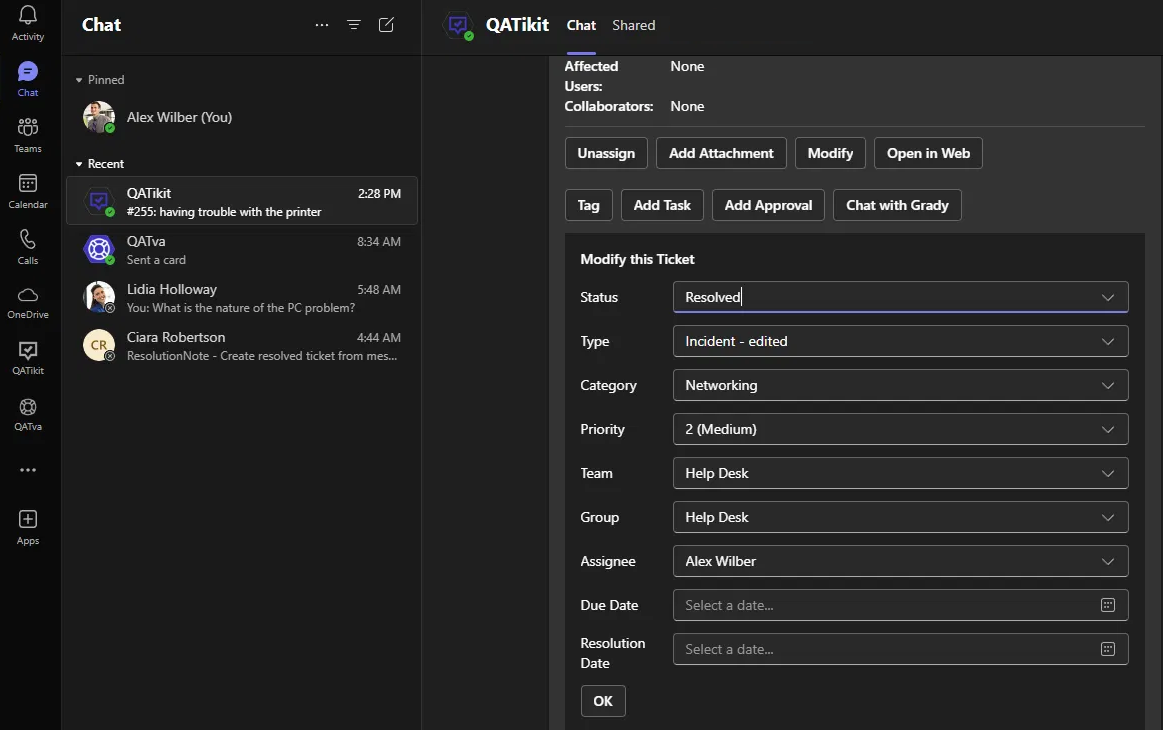
    Sending Forms (Edit Ticket/Automation)

    Also arriving with the split of Forms from Templates, we're also introducing some new functionality specific to how you can work with Forms.

    First - need to resend a Form even though the Template has been applied?
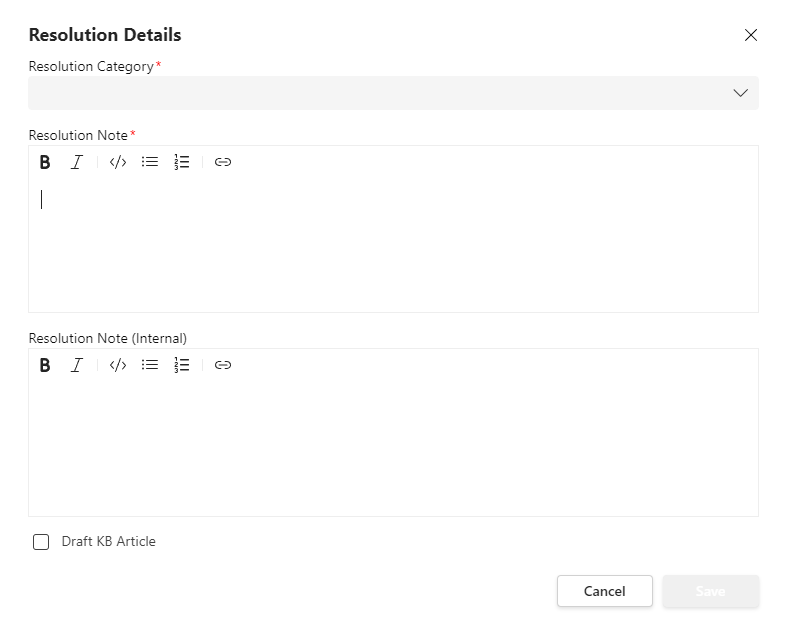
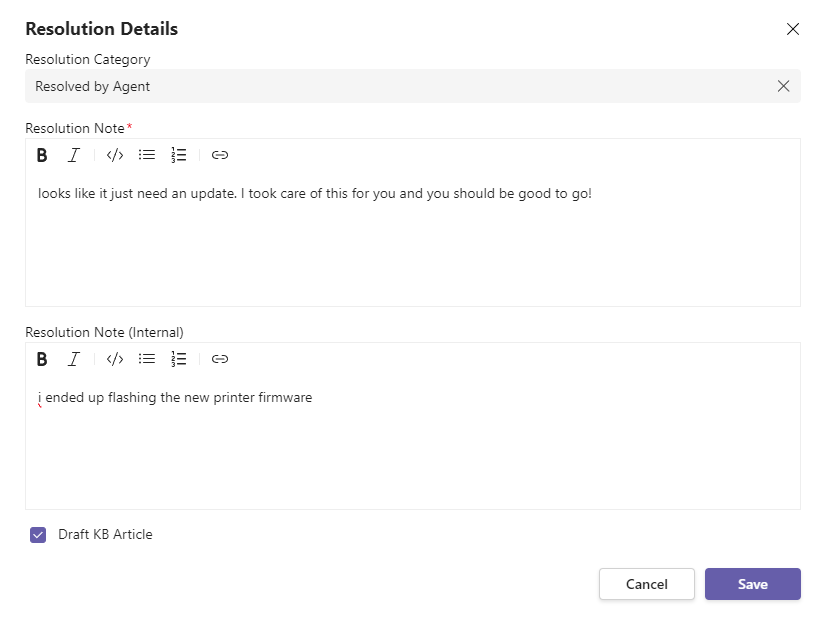
    Edit Ticket menu

    image

    Send Form window

    image

    You can now send/re-send a Form to any member associated to the ticket. In addition, you can also choose to Send the existing Answers to the Form back out to the same person who filled it out or someone else on the ticket.

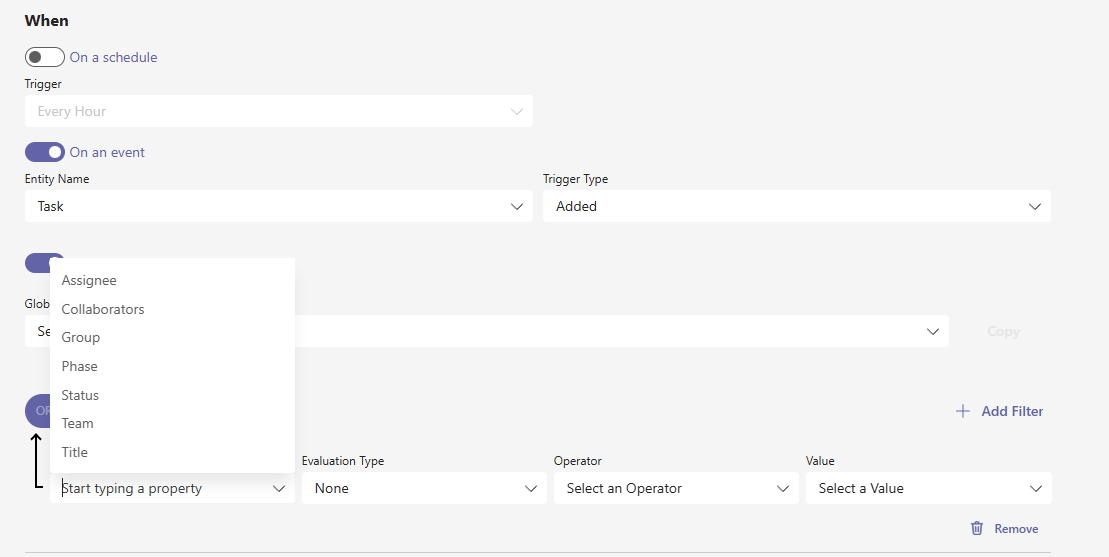
    Second - need to send a Form via Automations?

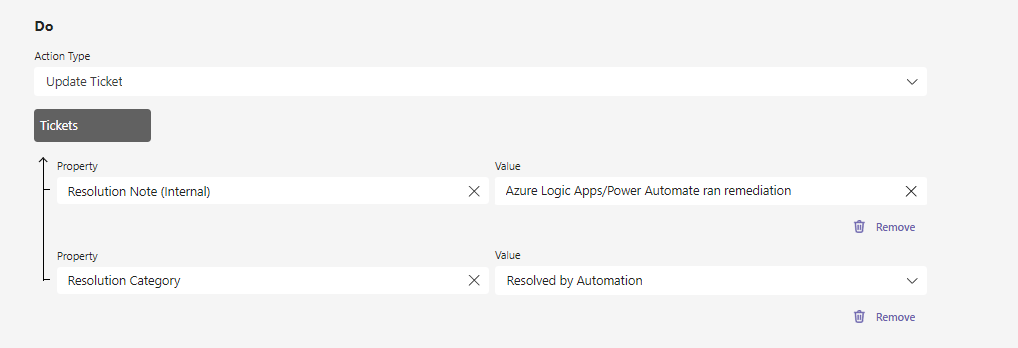
    You might already be familiar with the fact you can Apply a Template within an Automation.

    image

    But with tonight's update, you'll also gain another Automation action with the addition of Send Form

    image

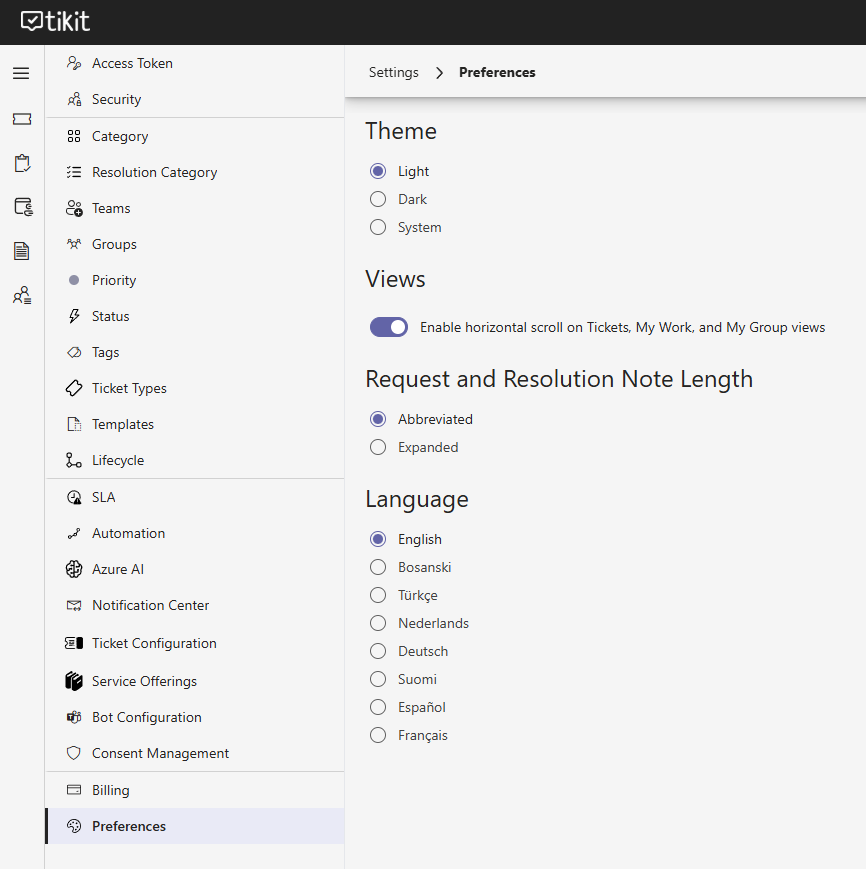
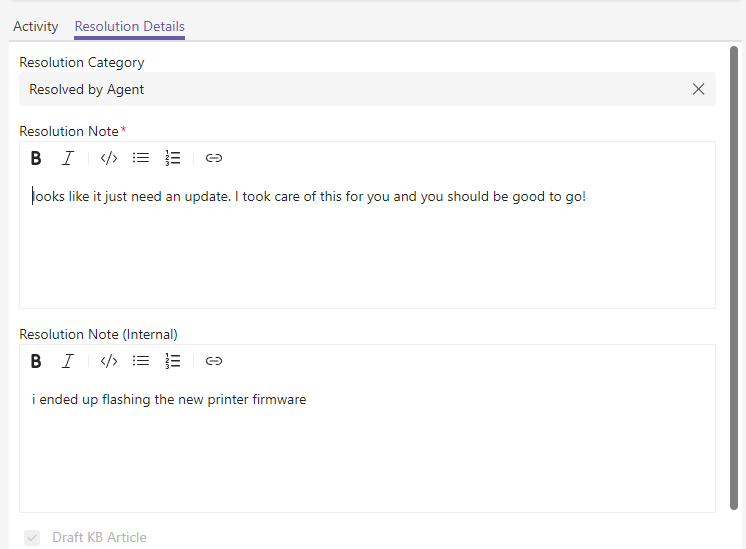
    Third - Forms is now its own dedicated Tab when editing tickets

    With the introduction of Multi-Turn Cards, we also moved the Forms from the right hand side to its own dedicated tab. This ensures that regardless of the number of Forms associated to your Template, they'll have their own dedicated area without feeling crammed along the right.

    image

    But if you want it back the other way. We made it a user preference giving you the flexibility to choose on a per Agent basis how you want to view things.

    image

    Just one more thing

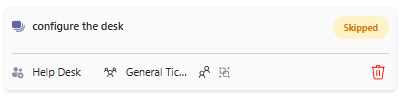
    Something else happening in this release is sorting of all administrative concepts such as Teams, Groups, Tags, Templates, Forms, Lifecycles, SLAs, and Automation. But beyond just sorting, we're also adding more fields to the Templates view to help you navigate them easier at a glance.

    Check out Templates that now offers the associated Team, Group, Assignee, if a Form is related, and the associated Lifecycle
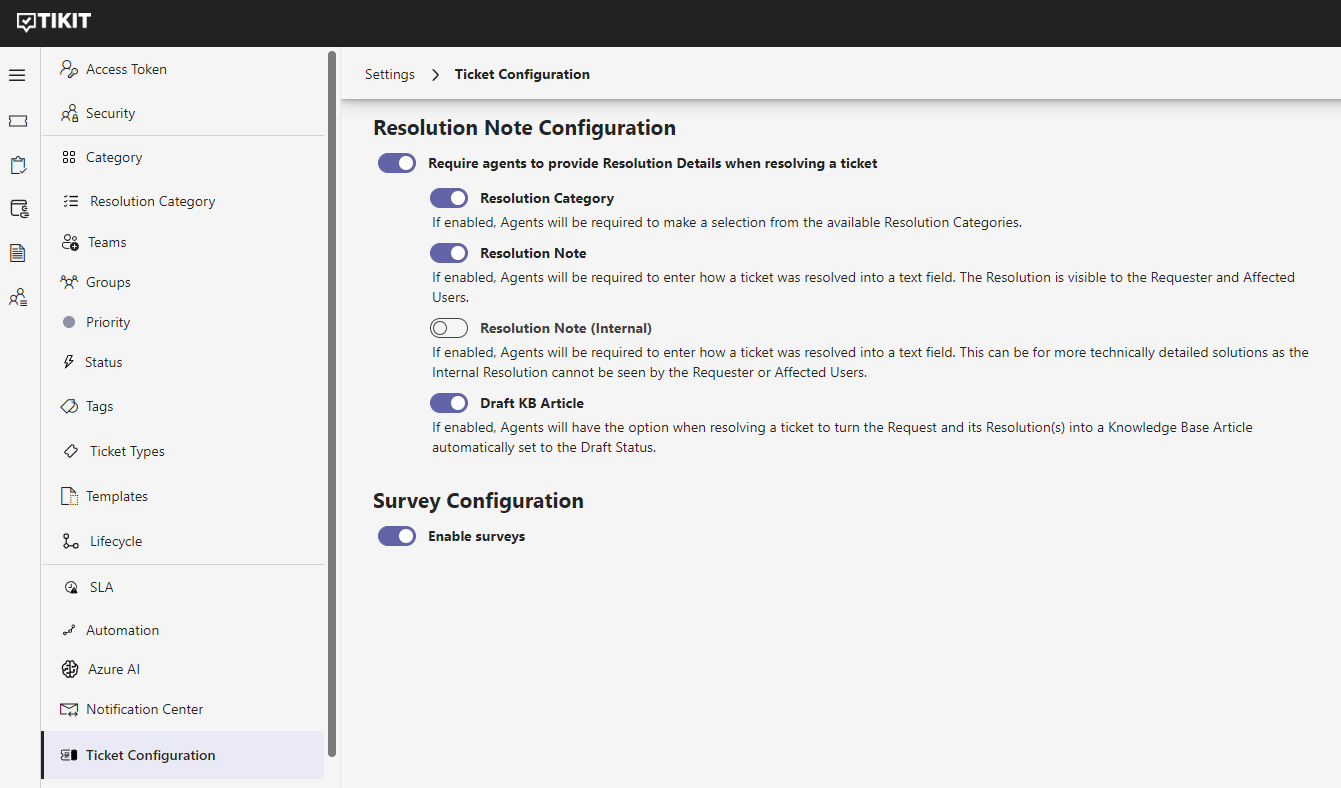
    image

    Wrapping Up

    And that about does it for these two features in this release. But as always, we've got plenty of more features on the way this year and this week.

  3. Group Chat

    New Feature
    Improvement
    Announcement

    When it comes to issues that impact a wider audience of employees. You might prefer to be able to talk in real time with the Requester, Affected Users, Collaborators, and skipping over communication between the bots entirely.

    With today's release, we're rolling out the first phase of our phased approach with the introduction of Group Chat.

    createGroupChat01

    Creating a Group Chat is an agent controlled action for now, ensuring that only agents can start Group Chats. With a Group Chat having been created on a ticket, we can directly from the Agent portal open the Group Chat in Teams with a single click.

    image

    Group Chat

    When a Group Chat is created, a few things will happen:

    • Tikit Virtual Agent creates a Teams Group Chat with the Requester, Affected Users, Assignee, and Collaborators
    • Tikit Virtual Agent introduces itself
    • Tikit Virtual Agent pins its introduction with a link to the ticket

    The message Tikit Virtual Agent introduces itself with can be customized in Bot Configuration as seen below:

    image

    With a Group Chat created, there is some additional functionality that becomes exposed through Teams. For starters, let's add an employee to the Group Chat directly inside of teams. Here we'll add Adele and provide access to the entire chat history.

    image

    When this is done, on the backend that change is not only tracked but Adele is automatically added as an Affected User to the ticket.

    image

    Likewise, if she or anyone on the ticket were to be removed, they would automatically be removed from the Group Chat.

    image

    But what happens if we try to the remove the Requester from Teams?

    image

    In this case, while Teams allows the user to be removed the ticket requires a Requester. Tikit Virtual Agent will automatically add them back to the Group Chat and ensure they remain the Requester.

    Next, what would happen if one of our Affected Users try to remove someone else from a Group Chat?

    image

    In a similar fashion, while Teams allows anyone to remove someone from a Group Chat. Affected Users receive a message informing them that an Agent needs to make this change. Agents are free to perform this change from Teams or on the Agent Portal.

    And something else that is likely to happen on the Agent portal is either changing the Request itself or changing the Status of the ticket. Let's rename the ticket to "application issue" and set the Status to Pending.

    image

    Once saved, this change is reflected immediately inside of Teams.

    image

    image

    Printing

    For those amongst us who need to print tickets for meetings or to share with external auditing, we've redesigned the entire print layout to include everything on tickets.

    image

    OpenAI on Azure, System Prompt

    Whether you're looking to better frame responses generated by your OpenAI instance, imbue company culture, or give responses some personality. We're now exposing the System Prompt that lets you set the tone of generative responses.

    image

    The default System Prompt is seen above, but you could replace or add to the above:

    • Answers you provide should be truthful but said in a light hearted tone
    • If you are asked who you are, respond by saying "I'm Tikit Virtual Agent of course!" If you are asked how you know what you know, respond that your knowledge is based entirely upon what has been uploaded.

    Automations, Email Contains

    If you're looking to improve ticket handling for the Requester based on their email's domain - you can!

    image

    Wrapping up!

    There are two more things worth highlighting that are arriving with this release:

    • Tikit Virtual Agent on mobile now defaults to a chat first experience rather than defaulting to the web experience.
    • Tikit's email connector has been rebuilt completely from the ground up to offer greater resiliency against bursts of any email volume.

    We'll see you at the next Technically Speaking!

  4. Tikit API Documentation

    New Feature
    Improvement
    Announcement

    Exploring, integrating, and developing with Tikit is getting even easier with the introduction of Tikit's new API site available at https://tikitapi.cireson.com/

    image

    Up until now, there are a handful of ways you might have been exploring Tikit's API:

    • Using your favorite browser's Dev Tools
    • Power BI/Excel
    • Talking on Teams with one of us :)

    This was a roadmap item we wanted to deliver in a way that made it approachable to everyone of all skill levels. So rather than provide just documentation, we've made this site fully interactive with support for entering production tokens, obtaining production results, and changing production data.

    Alternatively, if you prefer using Postman. The site also provides a full fledged Postman collection you can download and use right at the top of the page.

    image

    Once you have a token ready you can start interacting. For example, if you want to add a comment to a ticket you can!

    image

    Again, this makes use of production API keys which only Tikit Admins are capable of generating.

    As you begin to explore this, remember changes made here will impact your production environment. We highly encourage you to generate new, purpose built keys rather than re-use existing ones you may already have for integrations such as Power BI or Excel. This not only helps you keep things tidy in your environment, it also ensures you can easily revoke keys without disrupting other integration points.

    As always, we'll cover this and more on Technically Speaking next Thursday!

  5. Visual Service Catalog

    New Feature
    Improvement
    Announcement

    With an ever growing list of Knowledge to deflect, Templates to serve, and not to mention re-training of your Knowledge Base to meet employee chat results, it's possible that some may prefer to browse all (or some) of the Offerings that you've setup in Tikit.

    But perhaps a better way to say that is you and your fellow employees just might want to browse the all new Service Catalog.

    image

    Knowledge Base -> Service Catalog

    Starting today for Agents, we're not only renaming this section but we're also bringing about an entirely new layout for this update. Here you'll quickly be able to see all of your Catalog Items, if they are Knowledge, Templates, and if you've promoted them to Request Offerings.

    image

    And it's here within Service Catalog, you'll be able to create and edit Catalog Items. Only instead of editing in a popup, you'll get the full page to add Phrases, define the Status, mark as Agent Only, and of course a full text area for writing up Knowledge.

    image

    Of course, you can always flip to serving a Template as a response. But you'll notice you a new option to Enable Request Offering.

    image

    Once you've enabled a Request Offering, you can define it's Title, Description, order, and which Service Offering it belongs to on the Visual Service Catalog located on the requester portal at https://web.tikit.ai/requests.

    image

    Ticket Configuration, Service Offerings, and Show Archived

    But you might be asking yourself:

    • What's a Service Offering? Can I define those? Do they have to be departments? Can I call them something else? What about icons?
    • Can I control the Visual Service Catalog experience? What about the layout? Can I choose to turn it on or off?

    That's why also arriving with this update, are several updated Settings.

    Updated Security Roles

    image

    Knowledge Agents now become Service Catalog Admins. Like today, they have full control over the Service Catalog. They can control what's published, phrases used, and all of the details on a per Catalog Item level.

    But we're also introducing Service Catalog Readers. A read-only role that enables members to browse and look up items in the Service Catalog section of the Agent portal.

    Ticket Configuration

    image

    Within the Ticket Configuration section, you'll be able to decide if you want to enable the Service Catalog as well control how the Add Request Action behaves on the Requester portal.

    image

    You can have it set to:

    • Use Ticket Deflection: Always use Ticket Deflection and search against everything you've published up until this point
    • Create Ticket: Avoid Deflection and go straight into Ticket Creation
    • Hidden: Entirely remove the Add Request button from the page

    Service Offerings

    image

    It's here you'll be able to Create, Edit, Archive and even Delete your own Service Offerings. These can be called whatever you'd like and even styled with custom icons.

    image

    Preferences

    image

    This update also introduces a Toggle for enabling horizontal scroll on views. This is configurable on a per Agent basis.

    Results per Page

    image

    Another display setting you'll also notice is the ability to control the number of Results per Page. You can find it in the lower, right hand corner of your views.

    Show Archived

    image

    Last - If you're looking at the Service Offerings page you might have noticed something on that page. Not only does the "Show Archived" toggle exist, but it's disabled by default. This small, but long requested item makes it way to the other configuration pages as well such as Category (seen above), Resolution Category, Priority and more.

    Wrapping Up

    Service Catalog is enabled by default for everyone, but will only appear on the Requester Portal if at least one Service Offering and Request Offering have been published.

    That about covers it all for the Service Catalog. We certainly have more planned and more features like we discussed on the last Technically Speaking that will make their way into the Service Catalog when they release later this year. See you on Technically Speaking tomorrow!

  6. Adaptive Card Designer Enhancements

    New Feature
    Improvement
    Announcement

    Tikit not only builds on Teams, but Microsoft's Adaptive Card Designer framework to support customizations so you can:

    • Apply Templates with Custom Forms
    • Have Tikit Virtual Agent respond with those very same forms to gather input at ticket creation
    • Build Custom Forms using the Microsoft Adaptive Card Designer

    And up until this point, we've rendered that exact Microsoft experience throughout Tikit. But today, we're taking the Adaptive Cards Designer even further to give you even more flexibility, more customization, and all within an experience you already know.

    letsgetit

    New Options in Adaptive Card Designer

    Today's update introduces all Ticket Properties, some Ticket Extras, and a new Input (People Picker) when designing Custom Forms.

    image

    So if you're looking to:

    • Let an End User pick other Affected Users when submitting a ticket
    • Set a Category or Tags on ticket creation
    • Let an End User upload Attachments on initial ticket submission
    • Remove the "Status of My Requests" button from the New Ticket card
    • Wholly customize the default New Ticket card
    • Give fields entirely different names
    • Dynamically control the Request with variables

    YOU CAN!

    image

    Inputs

    Let's start with one of the first items you can bring into a form, which is a request we've heard from several customers - "I really want to be able to provide a People Picker."

    image

    Just like you'd expect, this control can be drag and dropped directly into a form. Like other controls, this can be renamed to something else, set to optional or required, and most importantly define whether or not to accept one or many selections. With the People Picker control, regardless of the people chosen - the selection does not map to any underlying ticket property. But the selection is available on the form, and thus able to be used inside of Excel, Power BI, and of course Power Automate.

    Ticket Properties, Variables, and The Default Template

    But controlling things like the Status, Tags, and Adding Attachments have a much more tangible impact to tickets being worked. Once placed on a form, the underlying ticket property will shift accordingly. Whether you are applying the Template yourself or it's being served via Deflection. Bringing Ticket Properties to forms allows End Users and Agents to directly control those properties before (and even after) the ticket is submitted.

    Default Template: Requester Create Ticket

    To help explain how these properties and variables are used. Today we're also addressing another long standing request, which is the ability to edit the New Ticket card.

    image

    Now, whenever you say "new ticket" to Tikit Virtual Agent or there is no Deflection to serve, the card above will be presented. While this Template shows "Created By Tikit", it can be modified as little or as much as you'd like and no less with all of the functionality in this update.

    Recreating the Email Experience in Teams

    Continuing along the "New Ticket" experience, lets explore some more customization arriving with this improvement.

    As you're no doubt aware in Tikit's email connector:

    • the Subject becomes the Request
    • the Body becomes the first comment on a ticket

    With today's update, you can now optionally build that experience to be served by Tikit Virtual Agent. Best of all, this could be your Default New Ticket template, a new process you want to create for Deflection, or both.

    image

    In the above, we're using the:

    • Request property (renamed to Summary)
    • Add Comment (renamed to Detailed Explanation)

    You'll notice that with regards to Add Comment, you can optionally enable support for Internal Notes. Perfect when you're making forms just for Agents. But in regards to the Request field, we have just a few more options to explore:

    image

    Apart from being able to rename the field, you can also perform three additional actions with the Request field:

    • declare if the field is Initially Visible to the person filling the form out
    • process variables from the Teams Conversation and/or the Card itself
    • declare the contents of the request for the End User. Wait. What?

    Ticket Variables and Form Variables

    Historically when chatting with Tikit Virtual Agent, when no Knowledge can be served the message sent to TVA auto-fills out the Request portion of the card.

    image

    Since it's now a variable you could hardcode some text in front of {{message}}, after it, or remove it entirely.

    But where this might make the most sense is for example an Onboarding Request. You could:

    • remove {{message}}
    • uncheck Initially Visible
    • modify an existing Template to use the Id of other inputs on the form to control the Request without having to use Power Automate to update it.

    Let's take a look at the following example with a few fields that will drive the Request instead of the {{message}}.

    First Name = firstName

    image

    Using {{firstName}} and {{lastName}} in the Request

    image

    Ticket has been submitted and Request set per configuration above

    image

    This grants total flexibility over the message that triggered the TVA response, the Request, and if the chosen fields are even shown initially to the user filling the form out.

    Default Template: Multi-Department Picker

    Since the default Template can be modified to include a Team picker, we're removing the following setting from Bot Configuration.

    image

    But don't worry! Whether or not you had it enabled or disabled - we've migrated that experience into your respective Default Template for you.

    image

    Add Attachment, Collaborators, and Assignment

    There are a few of other controls here in this update that are a bit more unique but still remain straightforward in their use.

    Add Attachment

    One of our biggest requests has the ability to enable support for uploading files on initial ticket creation. By simply dragging the "Add Attachment" control into your form that's exactly what you get.

    image

    Collaborators

    If you're looking to define who else should be assigned to a ticket, you can drag the Collaborators control out onto a form. This control features two presentation choices, Lookup which is the default behavior seen below.

    image

    Or alternatively, List. In this case, all of the Agents are listed out and can be checked off on the form.

    image

    Which presentation layout you choose above ultimately depends on your preference.

    • If you only have a few agents, List might make more sense as there is a small list of Agents to choose from.
    • If you have tens or hundreds of Agents or are heavily leveraging Multi-Department scenarios with Tikit, Lookup will help keep your form tidy

    But no matter what, the choice is yours as to how you want to present Collaborators.

    Assignment

    We're also introducing support for a unified control that helps you scope the assignment of a ticket.

    image

    With the Assignment control, you can narrow down the list of potential Assignee's on a form based on their Team/Group. In this case, you could imagine a scenario where Change Requests for IT should only allow IT based Assignment.

    image

    Data Sources

    We're also addressing another request with this release and it's the ability to customize the choices a Requester has when filling out a form. Specifically:

    • What if on Multi-Department picker, you only want to show 3 of your 7 Teams?
    • What if you want the Requester to pick from 5 of your 40 Categories?
    • What if you want the Requester to pick from 7 of your 100 Tags that are "locations"?

    With Data Sources, we're giving you more ways to present what exists in your environment to Requesters without oversharing on a Template by Template basis. Best of all, Data Sources are configured globally. So you can create, edit, and delete Data Sources as you see fit. Data Sources are applicable to all pickers you use in Tikit today. Teams, Groups, Tags, Categories, and so on.

    Take the following example, where we've created a Data Source to show a trimmed down selection of Teams but only for the Default New Ticket experience. In this case, we want our users to experience the Multi-Department Picker, but we only want to show a subset of Teams for them to be able to create tickets for.

    image

    image

    The Agent Experience

    But after all is said and done and your forms are configured/submitted by your fellow employees.

    • What happens on the Agent side?
    • What if you're using a Template that sets the Category but the person filling out the form can pick the Category?
    • What if you want to alter the answers that control ticket properties after the ticket has been created?

    Let's change some answers on the form and click on "Update Answers"

    image

    In this case, you are still allowed to change answers however it will shift the underlying ticket properties where applicable. As you'd expect, this change is audited in full.

    image

    That's all for now!

    It feels like just yesterday Resolution Note went out, and now today - Adaptive Card Designer enhancements are live! We hope you are as excited as we are for this release, and can't wait to see the kinds of things you build with it.

    As we covered the other day on Technically Speaking, we've got a few more items on their way after this. Talk soon!

  7. Resolution Note

    New Feature
    Improvement
    Fix
    Announcement

    Resolution Note is now available! This feature brings several changes across all of Tikit spanning the Agent Portal (Tickets, Knowledge, Automations, Lifecycles, Views, and Knowledge) Teams one on one chat, and finally Teams Channels.

    From the outset, it's worth highlighting for all of our current customers this experience is opt-in. Given this experience alters how tickets are resolved, we want to make ensure the decision is in your hands as to when to enable this.

    With that out of the way, let's get into it!

    Updated Settings

    image

    With the introduction of Resolution Note, we've re-arranged a few things in the Settings area. Items are grouped a bit differently, but what you'll see above is that Tikit Configuration now contains the settings for Resolution Note and Surveys.

    Once enabled, you can choose which parts of Resolution Note are required or optional. In the case of Draft KB, whether or not the option is visible. These are important distinctions to highlight because once Resolution Note is enabled. The Resolution Category, Resolution Note, and Resolution Note (Internal) will always be visible when resolving a ticket but they are required/optional based on the above. Whereas Draft KB controls visibility.

    But the first item to configure here - Resolution Category - is a wholly new concept. What is a Resolution Category?

    Resolution Category

    image

    With Resolution Categories, we're giving you a way to further classify tickets based on their resolution. In this way, a new reporting metric becomes available.

    • How many Priority 1 tickets were self-resolved by the Requester? Resolved by an Agent?
    • How many tickets with a Category of Networking, assigned to the Support Team, were resolved by an Agent? Automation?
    • How many Tickets were self-resolved by a Lifecycle?
    • How many Tickets resolved at a minimum of 3 days do not have an Internal Resolution Note?

    But lets see this in action, how does this experience manifest itself across Teams and the Agent Portal?

    Resolving a Ticket in the Agent Portal

    image

    With Resolution Note enabled, once you're ready to resolve a ticket by changing the Status to Resolved and clicking Save. The above popup appears asking for details on how the ticket was resolved. If you're looking closely, you'll see the fields made required vs. optional map to the Resolution Note configuration earlier.

    It's also worth highlighting that Resolution Notes will go out to the Requester upon resolution of the ticket. Whereas Internal Resolution Notes, are more akin to private comments. The requester will never see them. So they are great for more technical breakdowns.

    But what about Resolution Category? After all - it had a default value. So why is it blank instead of populated with "Resolved by Agent"? The reason is because if the field is required, an Agent must choose the Resolution Category. If the field is made optional, it will auto-populate as seen below.

    image

    With a Ticket Resolved, you'll also be moved into a new experience within a ticket on the Resolution Details tab. So long as the ticket is Resolved these fields can be edited.

    image

    That's the resolution experience in the Agent portal. But what about Teams?

    Resolving a Ticket in Teams

    image

    If you're in a one on one chat with Tikit, just like before you can modify a ticket and resolve it. But upon doing so with Resolution Note enabled. You'll get a reply back from Tikit asking for more details.

    image

    Until this form is submitted, the ticket will remain in its current Status whether it be Active, Pending, etc. but it remains in this state within your one on one chat with Tikit.

    When it comes to working within a Team and specifically one of its Channels (Tikit Groups) you'll have a very similar experience, but certainly geared toward the Team concept.

    Resolving a Ticket within a Team's Channel

    When resolving a ticket within the context of a Team as seen below:

    image

    Tikit will reply within the thread of the ticket prompting for a Resolution Note. However in this case, all members of the Team have access to it.

    image

    This means anyone has the ability to set the resolution or Cancel the resolution. In which case, you'll see who performed this action:

    image

    Closing the Loop on Knowledge Base Deflections

    But in all of the above, Draft KB is a piece of functionality that anyone with the Knowledge Agent role can take advantage of. In this way, when a ticket is resolved:

    • A Knowledge Article will be created
    • It will be in Draft Status
    • It will be Agent only
    • The first phrase is the Request, the response is what was provided in the Resolution Note

    Let's check it out!

    image

    Like any other Knowledge Base article, it can edited, switched to a Template, made available to all users or just agents.

    Ticket Lifecycles

    With changes arriving for how tickets are resolved, what happens for Tickets that controlled by Lifecycles?

    image

    With Lifecycles, we're bringing Resolution Note directly into the Lifecycle's configuration. Allowing you to set values and ensure consistency in your ticket resolutions. Best of all, these fields respect notifications so when the ticket resolved - notifications go out. If something didn't work out the way you were expecting, because the ticket is in a Resolved Status. Agents can access the Resolution Details tab and provide further commentary on tickets Resolved by a Lifecycle.

    And don't forget - with Power BI or Excel, you could then report on Tickets with Lifecycles whose Resolution Notes aren't identical.

    Automations

    But if you're looking to do something custom whether. Resolution Note also is available within Automations!

    When

    image

    Build Automations based on when Resolutions are created on tickets

    Do

    image

    Add Resolution Notes to tickets that meet a given criteria

    Views

    And last but not least, Resolution Note makes its way into Views giving you the ability to choose these properties as columns to view, filter on, create new Views with, and included in Export to CSV.

    image

    image

    Wrapping up

    That was a lot! As you can see, Resolution Note touches so many different aspects of Tikit. We're excited to get this feature out and looking forward to our next release that will see some radical changes to Custom Forms and Adaptive Card Designer.

    Until Technically Speaking!

  8. Lifecycle Enhancements - Approvals, Tasks, and Transitions

    New Feature
    Improvement
    Announcement

    First thing tomorrow you'll be able to take advantage of all new functionality arriving for Lifecycles, Approvals, Tasks, and Transitions. All alongside even more ways to empower Super Agents within the organization. LET'S GO!

    Approvals

    Whether it's in a Lifecycle or added on the fly to a ticket, Super Agents and Admins can now edit an Approval. This is great because if someone is out of the office now you can flip approvers. Best of all, all changes to Approvals are audited within the ticket itself.

    01approval

    Tasks

    Let's just get right to it. Not only can you now assign Teams and Groups to a Task. But you can also assign Collaborators as well!

    image

    Plus, we're introducing an additional Status of "Skipped" to Tasks. This new Status functions identical to Completed but introduces a new way to mark Tasks and of course report on them.

    image

    This Status is more relevant than ever within Lifecycles as the "Use Default Logic" Transition respects Skipped in addition to Complete as a means to progress a Lifecycle forward.

    image

    These new fields on Tasks can also be seen within My Work and My Group Work views!

    image

    Lifecycle - Manual Transitions

    Since we introduced Lifecycles, Logic Builder provided a way to define how to move forward, backward, or wherever you'd like within a Ticket's active Lifecycle. What's more, the optional "Reason" field provides a way to show why you are returning to a specific Phase of work.

    But up until now, you've always had to respect the rules as defined within the Lifecycle. You're either always moving forward through Phases of work or you've moving elsewhere when some condition is met.

    02transition

    But now Super Agents and Admins can now manually transition into any Phase of work using that same Reason field. This change is audited against the ticket so it's clear as to where you've come from, and why you've transitioned to a particular phase.

    But if you're looking closely above, you might notice something else. Also available is the ability to add Tasks and Approvals on the fly into a Ticket with an active Lifecycle!

    image

    Automations

    And all of these changes come with updates to Automations!

    image

    Power BI/Excel updates

    Also worth mentioning that a simple refresh (manual or scheduled) of your Power BI or Excel templates will automatically introduce these data points on those respective queries. We'll have another update of the these reporting templates shortly to include new dashboards.

    Also available if you missed it are several new date fields that are automatically getting set for you directly on Tickets. They are:

    • First Assignment Date
    • First Private Agent Comment
    • First Agent Comment
    • First Requester Comment

    Again, all it takes is a simple refresh of your dashboards to unlock these new data points for you to report on.

    Technically Speaking for December

    We're also moving Technically Speaking up to this Friday the 20th. We'll go over these features and what's next. See you there!

  9. Test Your Knowledge Base with Chat Studio!

    New Feature
    Improvement
    Announcement

    Interested in experimenting with how your KB could respond to different prompts? With Chat Studio, we're giving Knowledge Agents more ways to further tune Knowledge thresholds. Let's dive in!

    Chat Studio

    image

    Up until this point, tuning your Knowledge Base has always involved some back and forth between editing the Knowledge Base and testing those responses out with Tikit Virtual Agent. While recent improvements to the Knowledge Base, introduced support for KB Status, Agent Only responses, and OpenAI on Azure. There still wasn't a good way to experience everything the KB had to offer in a test environment.

    Now featured alongside where you configure Knowledge Articles and Synonyms. Chat Studio gives you the ability to test out responses without having to interact with Tikit Virtual Agent. Best of all, you can control what responses are returned. Such as:

    • including Draft and In Review articles
    • including Agent only articles
    • including Azure OpenAI results
    • including the deflection score of the returned response
    • how many responses are returned to simulate multi-response
    • setting a unique scoring threshold for Chat Studio

    image

    We'll cover this and more on Technically Speaking, this Friday September 27th!

  10. @Mentions, Agent Only Templates, Email Improvements, Drag n Drop, KB/Template Links, and Changes to Sending Comments

    New Feature
    Improvement
    Fix
    Announcement

    As the title of this announcement might imply, there are just a few things arriving with this release of Tikit. We're excited to get into the details about all of them, so no use in waiting, let's talk features!

    @Mention

    Let's start with one of our highest requested features, @Mentions. With @Mentions, we're giving Agents the ability to call other agents out from a comment within a ticket.

    image

    image

    Once sent, we're letting Tikit Automations take over with a new out of box automation called @Mentions.

    image

    Within this Automation that is enabled by default, you're free to customize just like you are today how that notification is sent. By default, we'll:

    • send to Teams and Email
    • use the Generic Ticket Card
    • let you you enable/disable the automation
    • let you customize the notification in full
    • let you use @Mention-ed users as properties within Automations
    • leave the Message blank as Generic Ticket Card will handle all of the details
    image

    Once mentioned, Agents will receive notifications from Tikit and Teams will even distinctly color the mention as well.

    image

    image

    Agent Only Templates

    With our last release focused around KB Improvements, we introduced support for Agent only KB Articles. What's more, Agents could now retrieve knowledge just like the rest of the organization through TVA.

    But what about Agent Only Templates? Forms that are linked to agent specific processes and Lifecycles? This release continues to extend Tikit Virtual Agent's capabilities providing Agents access to Templates that only will be seen by them!

    image

    • Someone needs access to a server? Azure resource?
    • Add an employee to a private Team?
    • Perform a one time virus scan against a computer?

    Templates and Lifecycles created for by Agents, for Agents, can now be served through TVA!

    Email Improvements - Minimum file size for Attachments

    When it comes to working tickets generated from email, something we've seen is that signature graphics aren't technically attachments. Well. They are, but they are certainly less important file attachments when working a ticket.

    If you're an agent, you might be deleting irrelevant attachments or performing some quick visual filtering to recognize the real attachment you're looking for. With our latest update to Tikit, we're giving you functionality to prevent files from being attached that do not meet a specific file size.

    image

    We've set this at 25kb for you, which should handle most scenarios. But as always, it can be tuned up, tuned down, or completely disabled by setting the value to 0. Now anytime an email is sent, each attachment's file size will be compared before attaching the file.

    Knowledge Base and Template Links

    When you’re talking about an issue or request with someone, you might already know the exact Template or Knowledge Article that would help them out. Rather than have them message Tikit Virtual Agent, it’d be even easier to just send them exactly what they need. That’s why “Get Link” is an option now available on Knowledge Articles and Templates!

    image

    image

    Improved Agent Commenting experience

    A small change, but a change none the less arriving with this release is how private comments are handled. Previously, the experience to leave a private comment required you to check a box and then send the comment.

    image

    But now you'll be able to do this with one less step. Now when leaving a comment, you'll have the option to Send as you always have in which case the Requester/Affected Users receive the communication. But you'll now also have the option to "Add Internal Note" which immediately makes this a private comment.

    image

    image

    But let's not forget about Attachments, let alone Private Attachments. Because something else arriving with this update is support for dragging and dropping attachments and copying and pasting from your clipboard directly into the chat experience.

    attachment01

    Best of all, this also carries over into other attachment experiences alongside @Mentions as well!

    image

    InTune - Device Manufacturer

    And last but not least, we're also bringing in a small update to the InTune connector. Now when looking at a user's Linked Devices you'll see the Manufacturer of that device.

    image

    As always, we'll cover this and more at the next Technically Speaking happening next week. Until then!